Simple salad with edible flowers, homegrown lettuce, salami, soft cheese and honey mustard dressing

We recently ordered edible flowers for the first time from the Able and Cole box scheme.  I’ve eaten flowers at restaurants before, which amuses me slightly as I imagine me and the Canadian chowing down on the flowers from the vase on the table.Edible-Flowers-from-Able-and-Cole

As well as the obvious aesthetic that flowers will provide to the greens of your salad, they tend to also add a certain peppery-ness – a trait that goes down very well in our flat.

So for this very simple salad we required:

  • Salad leaves – of your choice really, one of the things we’re growing is salad so we had a selection of ‘just harvested’ leaves (Marvel of the Seasons and Cocarde varieties)
  • A selection of edible flowers – we ordered from Able and Cole
  • About 150g soft cheese – we had a lovely soft cow’s milk cheese that had a medium flavour to it
  • Handful of fresh basil leaves
  • 2 medium tomatoes, chopped
  • Salami – we had enough for three of us to eat dinner, but obviously adjust to your preferences and the amount of people you are doing dinner for
  • Honey mustard dressing – we always make this and usually have some aged, sitting in the fridge waiting for a salad like this
  1. Carefully wash the edible flowers – just gently swirl them around in a bowl of water and then drain in a colander and pop on a piece of kitchen roll to full drain the water off.
  2. Wash the salad leaves and other vegetables – we kept our salad leaves whole as they were straight off the balcony and nice and tender. Chop if required though, also chop the tomato into bite-sized pieces.
  3. Slice enough cheese for each salad and pair each slice with a slice of your salami.
  4. Now serve up – mix the tomatoes and salad leaves and divvy up portions as required. Add a serving of the salami and cheese to each serving and then sprinkle the flowers and basil over the top.
  5. Drizzle each salad with your dressing of choice – in our case it was homemade honey mustard.
Variations
  • You could make this vegetarian by opting out of the salami and opting for some toasted sunflower seeds or pinenuts – both would work lovely. 
  • This could also be bulked out with some sliced avocado.

Edible flowers, basil, cheese and salami salad in pictures

This slideshow requires JavaScript.

Soda bread recipe

The last blog post was all about the joy of a day-long bread making endeavour, but sometimes you just don’t have the time for all the rising, knocking back and proving that a yeast-based recipe requires. And for that scenario we have the wonderful soda bread. In terms of ease, to me this recipe is of the same ilk as the scone recipe I posted previously. Easy!

I used to swear by a soda bread recipe I found courtesy of BBC Radio 4’s Women’s Hour, and then I went to the trusty River Cottage Bread Handbook and found a recipe that seemed (at least to my mind) to be easier and produced two beautiful little soda breads.

It goes a little something like this:

  • 500g plain white flour
  • 10g salt
  • 4 tsp baking powder
  • 300ml buttermilk, milk, thin yoghurt or water – both times I’ve done this recipe I’ve used a combination of yoghurt and water
  • For coating: a little rye flour

Oven at 200º

  1. This recipe is so simple. Combine all the dry ingredients in a bowl and make a little well in the middle.
  2. Pop the dry ingredients in the middle well you’ve made and carefully combine to make the dough.
  3. Knead briefly and then turn out onto a lightly floured surface and divide in half.
  4. Shape each half into a round and flatten down to about 5cm thickness and flour loaves all over with rye flour – or whatever flour you have to hand.
  5. Next cut a cross in the loaves with a knife – these cuts should go almost to the bottom of the loaf.
  6. Put the loaves on a baking tin, lightly floured, and then pop both in the oven for around 20 – 25 minutes until browning and the loaves fell hollow when tapped.

Eat hot out of the oven with soup, stew, cheese and chutney,  with a salad…in fact with anything, or just as it is. A very satisfying bread to bake.

Soda bread recipe in pictures:

Basic bread recipe – can be white or brown and makes enough for a loaf and six buns

Last weekend I, in my infinite wisdom, decided that we weren’t going to buy bread rolls for our homemade veggie burgers – oh no – we were going to make the whole darned thing from scratch. Another recipe from one of the River Cottage Handbooks – this time no.3. The recipe goes a little something like this:

  • 1kg strong bread flour – I used approximately ¾ white and ¼ oak smoked wholemeal stoneground
  • 20g salt
  • 10g powdered yeast
  • 600ml tepid water
  • Oil – for oiling the bowl for proving
  • Tray of ice cubes

And making it goes a little something like this:

  1. Combine the flour, yeast and salt in a mixing bowl.
  2. Get your tepid water standing by, begin to add the water to the dry ingredients slowly – use one hand to start combining and the other to add the water. You might need to put the bowl on a wet tea towel or dish cloth to stop it from swivelling around while you mix.
  3. You might need to adjust the consistency – I did, perhaps because of the addition of the stoneground. I added approximately another 3-4 tbsps of tepid water to get the soft, sticky, doughy consistency.
  4. Next for the brute force, the moment of kneading. For this I grabbed a large wooding chopping board and used the tea towel again to give it some grip and then (without flouring the surface) began to knead. Now, I’ve watched enough River Cottage shows on TV to try something new in my kneading methods. What I did was stretch the dough more, so it was sort of stretched across the length of the board with one hand and then brought it all back to the top of the board back into a sort of ball. I timed myself doing this for 10 minutes and I had a lovely satiny ball at the end.
  5. I then shaped the ball of dough by bringing my hands in tightly underneath the ball and turning it 360º as I went – this sort of stretches out the top of the dough and makes it look rather beautiful actually.
  6. Next I cleaned my mixing bowl, dried it out and added a little bit of olive oil over the top of the beautiful dough and gently placed it in the bottom of the clean bowl and then I put the lot in a big plastic bag – I’m talking about the big clear plastic recycling collection bags, they’re perfect for this task. Then the dough went on the sideboard and the timer was put on for 1 hour and 30 minutes.
  7. It’s about now you want to get the oven going – the recommendation is wack it right up to about 220ºC and pop two heavy bottomed baking trays in there or a pizza/bread stone if you have one. We don’t, so we used two baking trays.
  8. By this time, the dough had risen beautifully and I turned it out onto the wooden board and gently walked my fingers across the surface to slowly deflate the dough and get the air out. Then I reshaped the pancaked dough back into the beautiful round it once was using the method above.  This rising and deflating was repeated twice more for another 30 minutes each time.
  9. I then took the dough back to the wooden board and divided it in half – I used a dough scraper for this and wiggled it side to side carefully to slowly divide the two halves. I then put one half back in the bowl carefully and back in the plastic bag, and dealt with the one half first.
  10. I divided this into 6 relatively equally sized balls and shaped them – I then wet the tops of each bun a little and then put a small amount of poppy seeds and nigella seeds into a shallow dish and turned the wet side of the buns into the dish to get a coating on the top. Next I covered them with a tea towel, popped the board the tea towel and the six little buns back in a second plastic bag and left for 15 minutes for one final prove – until they were about doubled in size.
  11. Now you’ve got to get things sorted, grab half the tray of ice cubes and pop them in a cup right next to the oven – you will be melting these in the oven to provide steam. Spray the little buns with a mist of water, if you don’t have a spray just sprinkle a little water over with your fingers.
  12. Now, you want to keep as much heat in the oven as possible, so you need to move fast. Grab one of the hot oven trays out of the oven, close the oven door and then transfer the buns from the wooden board onto the baking tray. Quickly return to the oven and before shutting the door grab the cup of ice cubes and transfer them to the other empty baking tray on the other shelf in the oven – these should immediately start to steam and melt. Shut the door quickly.
  13. After approixmately 5, when the top of the buns are starting to brown turn the oven down to 180ºC and bake for about another 15 – 20 minutes. The buns should be browned nicely and check they are properly cooked by tapping the side of one – if it sounds and feels hollow they’re ready. If in doubt leave for a couple of minutes longer.
  14. Remove to a wire rack to cool.
  15. Now for the remaining half. Turn the oven back up to the highest temperature – my oven goes to 220ºC but the River Cottage book reckons get it as high as 250ºC – and put the baking trays back in the oven.
  16. Remove the remaining dough from the bowl onto the wooden chopping board. It may have risen again, so poke out the air and reshape into the nice round again. I also cut two slits across this loaf, mostly because it looks pretty but I’m sure there’s another techincal reason for doing this.
  17.  Cover with tea towel and return to plastic bag again, as with the buns, leave for about 15 minutes until about doubled in size.
  18. Get your ice cubes ready again in the cup, spray the top of the loaf with water, grab the hot tray out of the oven and transfer the loaf to it. Open the oven again and quickly pour the ice cubes onto the other hot baking tray.
  19. Now bake the loaf at high temperature for about 10 minutes until browning and turn down to 180ºC. Bake for about 30 – 40 minutes until cooked, check in the same way as the rolls.

Overall this was a long, but highly satisfying process. There is something incredibly meditative about kneading and proving, shaping and baking. Clearly I do need a bit more practice at the shaping thing, as I made some pretty funky shaped bread, but the texture and taste was spot on.

This is a great recipe as made buns for dinner and lunch as well as a loaf for the week.

baking bread in pictures:

This slideshow requires JavaScript.


Spicy chilli, butternut squash, feta and mint bulgar wheat salad

This is a great quick recipe for an evening. Usually we would make up enough to take for packed lunches the following day. 
 
  • cooked bulgar with chopped chilliApproximately 80g per person of bulgar wheat
  • 500ml of stock per 100g bulgar wheat – can be veggie, chicken, mushroom
  • Medium-sized butternut squash, cut up into 1cm cubes
  • 3-4 tbsps olive oil
  • Salt
  • Pepper
  • 2 tbsp maple syrup or honey or brown sugar (depending on what you have)
  • 1 large chilli pepper, deseeded and finely chopped
  • Block of feta
  • Handful of mint chopped or torn
  1. Put the bulgar wheat and stock into a saucepan and bring to simmer, cover and leave for approximately 15 minutes. We stirred a couple of times to make sure the bulgar wheat didn’t stick to the bottom of the pan. You will be able to tell when the bulgar wheat is cooked, it will be fluffy – a bit like is couscous when it’s ready.
  2. Lightly coat the butternut squash in olive oil and roast the  in the oven (around 180ºC -200) until starting to crisp and brown up nicely (about 20 minutes). Take them out, stir and return to oven for another 5-10 minutes. Then drizzle the  1 tbsp maple syrup over the squash and put back in the oven for another  5-10 minutes – watching carefully so they don’t burn. 
  3. Now you can assemble the salad – add the butternut squash (including all the oil and juices from the roasting pan) and the bulgar wheat in a bowl. Then add the chopped mint, chilli, another tablespoon of maple syrup or honey, 2 tbsps olive oil, season with salt and pepper and crumble in the feta and you’re ready to serve.
Suggested variations:
Instead of feta and maple syrup, use goat’s cheese and honey.
Instead of bulgar wheat, use any barley or buckwheat for the nutty flavour.
Try it with the addition of some North African spices – harisa, cinnamon etc.

Spicy chilli, butternut squash, feta and mint bulgar wheat salad in pictures

This slideshow requires JavaScript.

North American Pancake recipe – can also be made with blueberries/blackberries/raspberries or any other berry really

This pancake recipe is a winner, from Ty’s mom’s recipe book from way back when – that’s why it’s in cups.

The recipe goes like this:

  • 1 ½ cups flour
  • 3 tbsp caster sugar
  • 2 tsp baking powder
  • ¾ salt
  • 1 medium egg
  • 1 ¼ cup milk
  • 3 tbsp vegetable oil
  1. And the process is very simple, combine flour, salt, sugar and baking power in a large bowl.
  2. Then make a well in the dry ingredients and add the wet ingredients, milk first, then oil and then the egg. Start combining the egg into the milk with a whisk and slowly bring the dry ingredients in until fully combined. Keep whisking until the lumps are out. You should notice some bubbles forming on the top of the batter where the baking powder is doing it’s thing.
  3. We always use a cast iron frying pan, but whatever you have will do, add a tiny bit of oil in the pan so the pancakes don’t stick. Make sure the frying pan is nice and hot and then add a ladle-full of the batter on. Cook the pancake until you start to see lots of bubbles on the uncooked side, then turn over and cook the other side.
  4. We also added blueberries to the latest batch, just drop a few blueberries into the batter on the uncooked side while in the saucepan and then flip the pancake over so the the blueberries are on the underside and get cooked so they go all gooey and wonderful.
Serve with creme fraiche, honey, maple syrup, sugar and lemon or whatever you want really.

Blackberry upside down cake recipe

Last weekend we made an incredible discovery; a veritable magic porridge pot of Stratford blackberries, wild and free and ready for picking. There can be nothing better. With cycling helmets still on we got stuck in, dodging stingers and cursing the thorns, and we soon got to enjoy the spoils of our efforts.  Such freshly picked berries deserve to be eaten as soon as possible,  but they also deserve to be made into a blackberry upside down cake and they got what they deserved.

The cake recipe, adapted from the River Cottage Handbook No.8’s plum upside down cake – substituting the 500g plums for 250g foraged blackberries, is as follows:

  • 200g self raising flour – I don’t actually have any self raising flour, so to create the self raising flour out of plain flour I added 1 level tsp baking powder and an extra pinch of salt to the 200g plain flour. I also used brown flour, the River Cottage recipe doesn’t specify either way.  You can chose your own preference, just think in terms of if you want white or brown bread.
  • Pinch of sea salt
  • 200ml butermilk – which I also didn’t have, so I made the equivalent using 200ml milk with a tsp lemon juice left to stand for at least 10 minutes before using in the recipe.
  • 2 tsp vanilla extract
  • 100g softened, unsalted butter cut into small pieces
  • 125g caster sugar – I always use golden caster sugar
  • 2 eggs
  • 250g blackberries
  • 60g runny honey
  • 1 tsp rose water (the recipe calls for 2-3 tsps but given that blackberries have more water than plums I reduced the liquid added here)

I used a 21″ loose bottom cake tin. Recipe called for a 23″ one, but this was all I had and it worked fine and dandy.

Heat oven to 180°C.

  1. First line your cake tin – this is important so that the blackberry juices don’t leek out in the oven when it’s all cooking.
  2. Next prep the blackberries – wash and gently pat dry with kitchenBlackberries arranged in the bottom of a cake tin roll or a clean tea towel to get as much excess water off as possible. Arrange all blackberries on the bottom of the cake tin so that they are evenly spread.  Drizzle with the honey and then with the rosewater. Leave to one side while you get on with the sponge.
  3. For the sponge, using a wooden spoon or electric whisk beat the softened butter until creamy. Then add the caster sugar and beat until completely combined.
  4. Add one egg at a time and beat together with the mixture. If the butter/sugar mixture looks like it’s curdling a bit when you add the eggs, add a tsp of your flour to help bring it all back together.
  5. Combine your flour and pinch of salt so it’s evenly spread throughout (if using plain flour make sure you’ve added in the baking powder and extra pinch of salt).
  6. Now add the flour incrementally and add the buttermilk/homemade milk lemon mixture in small doses so it goes – add a bit of flour, mix, add a bit of buttermilk, mix and so on. Your sponge mixture will slightly resemble a batter mix  – don’t be alarmed, this is how it’s meant to be.
  7. Now, make sure the oven’s up to temperature and then grab the cake tin. The sponge mixture can now be added carefully over the top of the blackberry, honey, rosewater bed upon which it will sit. Make sure this is spread evenly and try and level out the mixture as, remember, the top here will actually be the bottom – what with the whole upside down element.
  8. Quickly shove the cake in the oven and leave for at least 40 minutes. The River Cottage recipe recommends 45 – 50 minutes in the oven, and our cake probably took about 50. Check the cake with a wooden skewer and when it comes out with no batter on your ready to pull it out.
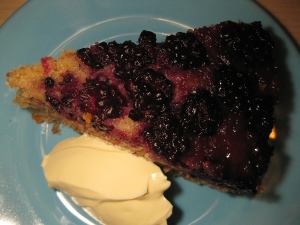
  9. Leave the cake to cool for about 10 minutes, but you still want it warm when turning it out onto a plate. Take the outside, surrounding part of the cake tin off, leaving the bottom part, then put the plate you will serve the cake on on top of the spongy part and, using a tea towel as it might be hot still, turn the cake onto the plate so that the blackberries are now on top.Slice of blackberry upside down cake served with creme fraiche

We served with crème fraiche and it was awesome. The cake really does need to be kept in the fridge because the blackberries will start to turn – this cake lasted just under a week before we polished the lot off.

Blackberry upside down cake in pictures

This slideshow requires JavaScript.

Can bake scones – because scones are the easiest – scone recipe

You cannot beat scones for ease. I have even knocked up a batch with a killer hangover on a Sunday morning. It helps that I live with a North American and we buy in bulk, so I always have the ingredients to hand. But you don’t need much and you don’t need a North American in residence.

Here’s one of the easiest things you’ll ever bake (in my opinion) core scone recipe from Daniel Stevens in the River Cottage Bread Book.

Scone ingredients list:

  • 300g plain flour – usually white but often I use brown and it still works with the recipe.
  • 2 tsp baking powder
  • Pinch salt
  • 75g unsalted butter
  • 50g caster sugar
  • 1 medium egg
  • 1tsp vanilla extract
  • 120ml double cream but I use milk
How to make the scones:
Oven needs to be at 200°C.
  1. Dan’s recipe instructions say to use a food processor to combine dry the ingredients and butter – this is useful for something like scones as you don’t get the butter too warm when working it.
  2. If you don’t have a food processor, hands are just fine and dandy – keep it old school and all – just make sure you don’t over work the butter and flour when rubbing it between your fingers. It just needs to be that well-known consistency – that is, of breadcrumbs. Add the sugar after the flour, baking powder, salt and butter is combined if doing it by hand.
  3. When the dry ingredients are combined, beat the egg, vanilla essence and cream/milk (depending on how bad that hangover is) and then add this to your breadcrumb-like remaining scone ingredients. Bring together by hand into a soft dough – again don’t over work it here – then turn out onto a floured surface and knead a couple times.
  4. Keeping that surface floured, pat or roll your pastry until it’s about 4cm thick and begin to cut out the scones with the pastry cutter of your choice. Dan recommends 6cm – 7cm pastry cutter and says this will make around 8 scones – mine must be much smaller because I’m sure this recipe made closer to 12 scones for me.
  5. Pop all the scones on a lightly greased baking sheet – sometimes I just lightly dust with flour – and pop in the oven until browning on the top and cooked right through. Dan brushes milk over the top of her scones in the recipe, I never do this though they obviously look darned good if you do.
  6. Scones should take around 15 minutes to cook, depending on their size. Check with a cocktail stick, or whatever you have to hand along these lines – stick it in one and it should come out clean. I don’t actually ever do this I forget every time, though the 15 minutes has always done the trick.

Eat hot with good butter, homemade jam and, of course, a cuppa tea.

Heart scones and teaI tend to make my scones heart-shaped because they are the only cookie cutters I own. Also it’s cute and makes a good photo as I’m sure you’re appreciating right now.

Fortunately I am lucky enough to have said North American in residence who likes to make jam. The scones here are served up straight out of the oven, with lashings of butter (no one said these were healthy) and strawberry and pepper jam.

We almost always make our jam from recipes out of the River Cottage jam book – with the occasional moment of inspiration (like the pepper). Pam the Jam’s recipes are awesome.

Can bake scones – because scones are the easiest – scone recipe

You cannot beat scones for ease. I have even knocked up a batch with a killer hangover on a Sunday morning. It helps that I live with a North American and we buy in bulk, so I always have the ingredients to hand. But you don’t need much and you don’t need a North American in residence.

Here’s one of the easiest things you’ll ever bake (in my opinion) core scone recipe from Daniel Stevens in the River Cottage Bread Book.

Scone ingredients list:

  • 300g plain flour – usually white but often I use brown and it still works with the recipe.
  • 2 tsp baking powder
  • Pinch salt
  • 75g unsalted butter
  • 50g caster sugar
  • 1 medium egg
  • 1tsp vanilla extract
  • 120ml double cream but I use milk
How to make the scones:
Oven needs to be at 200°C.
  1. Dan’s recipe instructions say to use a food processor to combine dry the ingredients and butter – this is useful for something like scones as you don’t get the butter too warm when working it.
  2. If you don’t have a food processor, hands are just fine and dandy – keep it old school and all – just make sure you don’t over work the butter and flour when rubbing it between your fingers. It just needs to be that well-known consistency – that is, of breadcrumbs. Add the sugar after the flour, baking powder, salt and butter is combined if doing it by hand.
  3. When the dry ingredients are combined, beat the egg, vanilla essence and cream/milk (depending on how bad that hangover is) and then add this to your breadcrumb-like remaining scone ingredients. Bring together by hand into a soft dough – again don’t over work it here – then turn out onto a floured surface and knead a couple times.
  4. Keeping that surface floured, pat or roll your pastry until it’s about 4cm thick and begin to cut out the scones with the pastry cutter of your choice. Dan recommends 6cm – 7cm pastry cutter and says this will make around 8 scones – mine must be much smaller because I’m sure this recipe made closer to 12 scones for me.
  5. Pop all the scones on a lightly greased baking sheet – sometimes I just lightly dust with flour – and pop in the oven until browning on the top and cooked right through. Dan brushes milk over the top of her scones in the recipe, I never do this though they obviously look darned good if you do.
  6. Scones should take around 15 minutes to cook, depending on their size. Check with a cocktail stick, or whatever you have to hand along these lines – stick it in one and it should come out clean. I don’t actually ever do this I forget every time, though the 15 minutes has always done the trick.

Eat hot with good butter, homemade jam and, of course, a cuppa tea.

Heart scones and teaI tend to make my scones heart-shaped because they are the only cookie cutters I own. Also it’s cute and makes a good photo as I’m sure you’re appreciating right now.

Fortunately I am lucky enough to have said North American in residence who likes to make jam. The scones here are served up straight out of the oven, with lashings of butter (no one said these were healthy) and strawberry and pepper jam.

We almost always make our jam from recipes out of the River Cottage jam book – with the occasional moment of inspiration (like the pepper).  Pam the Jam’s recipes are awesome.